"I'm not upset."
"You seem upset!"
"Sorry, I'm not upset at you. I know it was an accident. I'm just frustrated about how much work it is to clean it. It takes a long time and a lot of work, and it's been a really long couple of days is all. I promise, my upset is not at you. You're a good boy."
"I'm really sorry, I tried to clean it up. "
"I know baby."
Clean what?
This.

Yeah. This.

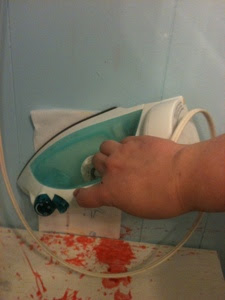
This gruesome scene is not murder, nor gore. It's wax. Lots and lots of bright red wax splattered and spilled ALL OVER the bathroom walls, counter and sink.
Why is this everywhere? Because everything Zak does, he does big. He starts out with a toe in the water and ends up way over his head. Every attempt to make it better made the mess bigger. Poor guy. He may lack a measure of common sense, but he makes up for it with tons of heart.
If I were watching this in a movie, I would be laughing. Because in a movie, the funny happens, cut scene, new scene, cleaning crew cleans up actual mess.
I have no cleaning crew. Just me. And an actual mess. So here I am, ironing wax off my walls. Yes, literally ironing my bathroom walls and shelves.
This method works a million times better than trying to scrape hardened wax and then scrubbing the stain until the paint peels. I know this, as this is not the first time this has happened, it's the third, in this bathroom. That's not counting all the little splatters that occasionally occur.
I discovered this method when browsing for 'ways to take wax out of towels.' I wondered if it could be a better way to remove it from the walls as well. Indeed, it is! Supremely better!

Here is my recipe for Miracle Wax Removal:
1 roll of paper towels
1 iron
1 boatload of patience (depending on amount of wax)
Insider's Tip: Use the toilet paper to cry in, save the paper towels, you might need all of them.
Plug in iron and turn on. I found a medium setting most effective. Don't set it to high as paper towel is flammable, and we are trying to avoid permanent damage to the paint.
Tear off and fold a towel short ways. Several of these can be prepared ahead if needed and desired.
Place towel directly over wax. Place iron on towel. Maintain steady heat until wax melts into paper towel. (About 15-30 seconds)
Remove iron and gently peel towel away from wall. Wax should have transferred to towel.
Repeat if necessary, using a fresh paper towel until all wax is removed. Some hard to reach sections may still need to be scraped, but using a really warm scraper helps (place in very hot water for a few moments, then dry before scraping)
Wipe wall with very hot cloth to remove any remaining residue.
Unplug iron, and enjoy your wax free wall!
Post Script -Since the men in my family seem unable to figure out that when it's lit the wax is melted, and that switching it off doesn't instantly harden the wax, I have wised up and will be finding my beloved Scentsy warmer a new place to reside in our home. That is assuming of course that the water that Zak poured on it to clean it didn't fry it.
"You seem upset!"
"Sorry, I'm not upset at you. I know it was an accident. I'm just frustrated about how much work it is to clean it. It takes a long time and a lot of work, and it's been a really long couple of days is all. I promise, my upset is not at you. You're a good boy."
"I'm really sorry, I tried to clean it up. "
"I know baby."
Clean what?
This.

Yeah. This.

This gruesome scene is not murder, nor gore. It's wax. Lots and lots of bright red wax splattered and spilled ALL OVER the bathroom walls, counter and sink.
Why is this everywhere? Because everything Zak does, he does big. He starts out with a toe in the water and ends up way over his head. Every attempt to make it better made the mess bigger. Poor guy. He may lack a measure of common sense, but he makes up for it with tons of heart.
If I were watching this in a movie, I would be laughing. Because in a movie, the funny happens, cut scene, new scene, cleaning crew cleans up actual mess.
I have no cleaning crew. Just me. And an actual mess. So here I am, ironing wax off my walls. Yes, literally ironing my bathroom walls and shelves.

This method works a million times better than trying to scrape hardened wax and then scrubbing the stain until the paint peels. I know this, as this is not the first time this has happened, it's the third, in this bathroom. That's not counting all the little splatters that occasionally occur.
I discovered this method when browsing for 'ways to take wax out of towels.' I wondered if it could be a better way to remove it from the walls as well. Indeed, it is! Supremely better!

Here is my recipe for Miracle Wax Removal:
1 roll of paper towels
1 iron
1 boatload of patience (depending on amount of wax)
Insider's Tip: Use the toilet paper to cry in, save the paper towels, you might need all of them.
Plug in iron and turn on. I found a medium setting most effective. Don't set it to high as paper towel is flammable, and we are trying to avoid permanent damage to the paint.
Tear off and fold a towel short ways. Several of these can be prepared ahead if needed and desired.
Place towel directly over wax. Place iron on towel. Maintain steady heat until wax melts into paper towel. (About 15-30 seconds)
Remove iron and gently peel towel away from wall. Wax should have transferred to towel.
Repeat if necessary, using a fresh paper towel until all wax is removed. Some hard to reach sections may still need to be scraped, but using a really warm scraper helps (place in very hot water for a few moments, then dry before scraping)
Wipe wall with very hot cloth to remove any remaining residue.
Unplug iron, and enjoy your wax free wall!
 |
| Zak's seal of approval! |
Post Script -Since the men in my family seem unable to figure out that when it's lit the wax is melted, and that switching it off doesn't instantly harden the wax, I have wised up and will be finding my beloved Scentsy warmer a new place to reside in our home. That is assuming of course that the water that Zak poured on it to clean it didn't fry it.
Love our Scentsy... Love our kids 1 million times more! ;) nice job!
ReplyDelete